Service Mesh and Microservices
9 out of 10 technology leaders have already transitioned in some form to entirely distributed architectures, allowing their organisations to respond more rapidly to changing business needs and capitalise on the elasticity of the cloud. Going from monolithic to microservice is not without its apparent challenges however; more moving parts often equates to more overhead, that is if managed improperly.
The array of technologies in the microservices ecosystem are designed to help engineers and architects improve the security, observability and traffic control of an organisation’s applications.
Only recently in December 2021, everybody was left hustling to find out if their software included Log4j software. Securing east-west traffic again came into serious focus and using such measures as mutual Transport Layer Security (mTLS) adds an additional layer of defense beyond perimeter controls, moving us closer to a highly secure Zero Trust framework. This model of assuming every digital transaction is malicious, is something organisations want to carry through, yet in reality the majority are in their infancy when it comes to adoption at 21% according to this poll from Optiv Security.
mTLS does offer a way for us to limit our ‘blast-radius’ and constrain the impact of a live vulnerability as hackers aren’t able to arbitrarily create certificates without being observed whilst traversing the network.
What is mTLS?
When one visits a browser with HTTPS prefixed to the URL, the browser will attempt to validate the server’s certificate to make sure they are who they really say they are.
mTLS upholds this Zero Trust paradigm, extending typical service-side SSL by also requiring the client to present its certificates for validation as part of the TLS handshake.
About the example
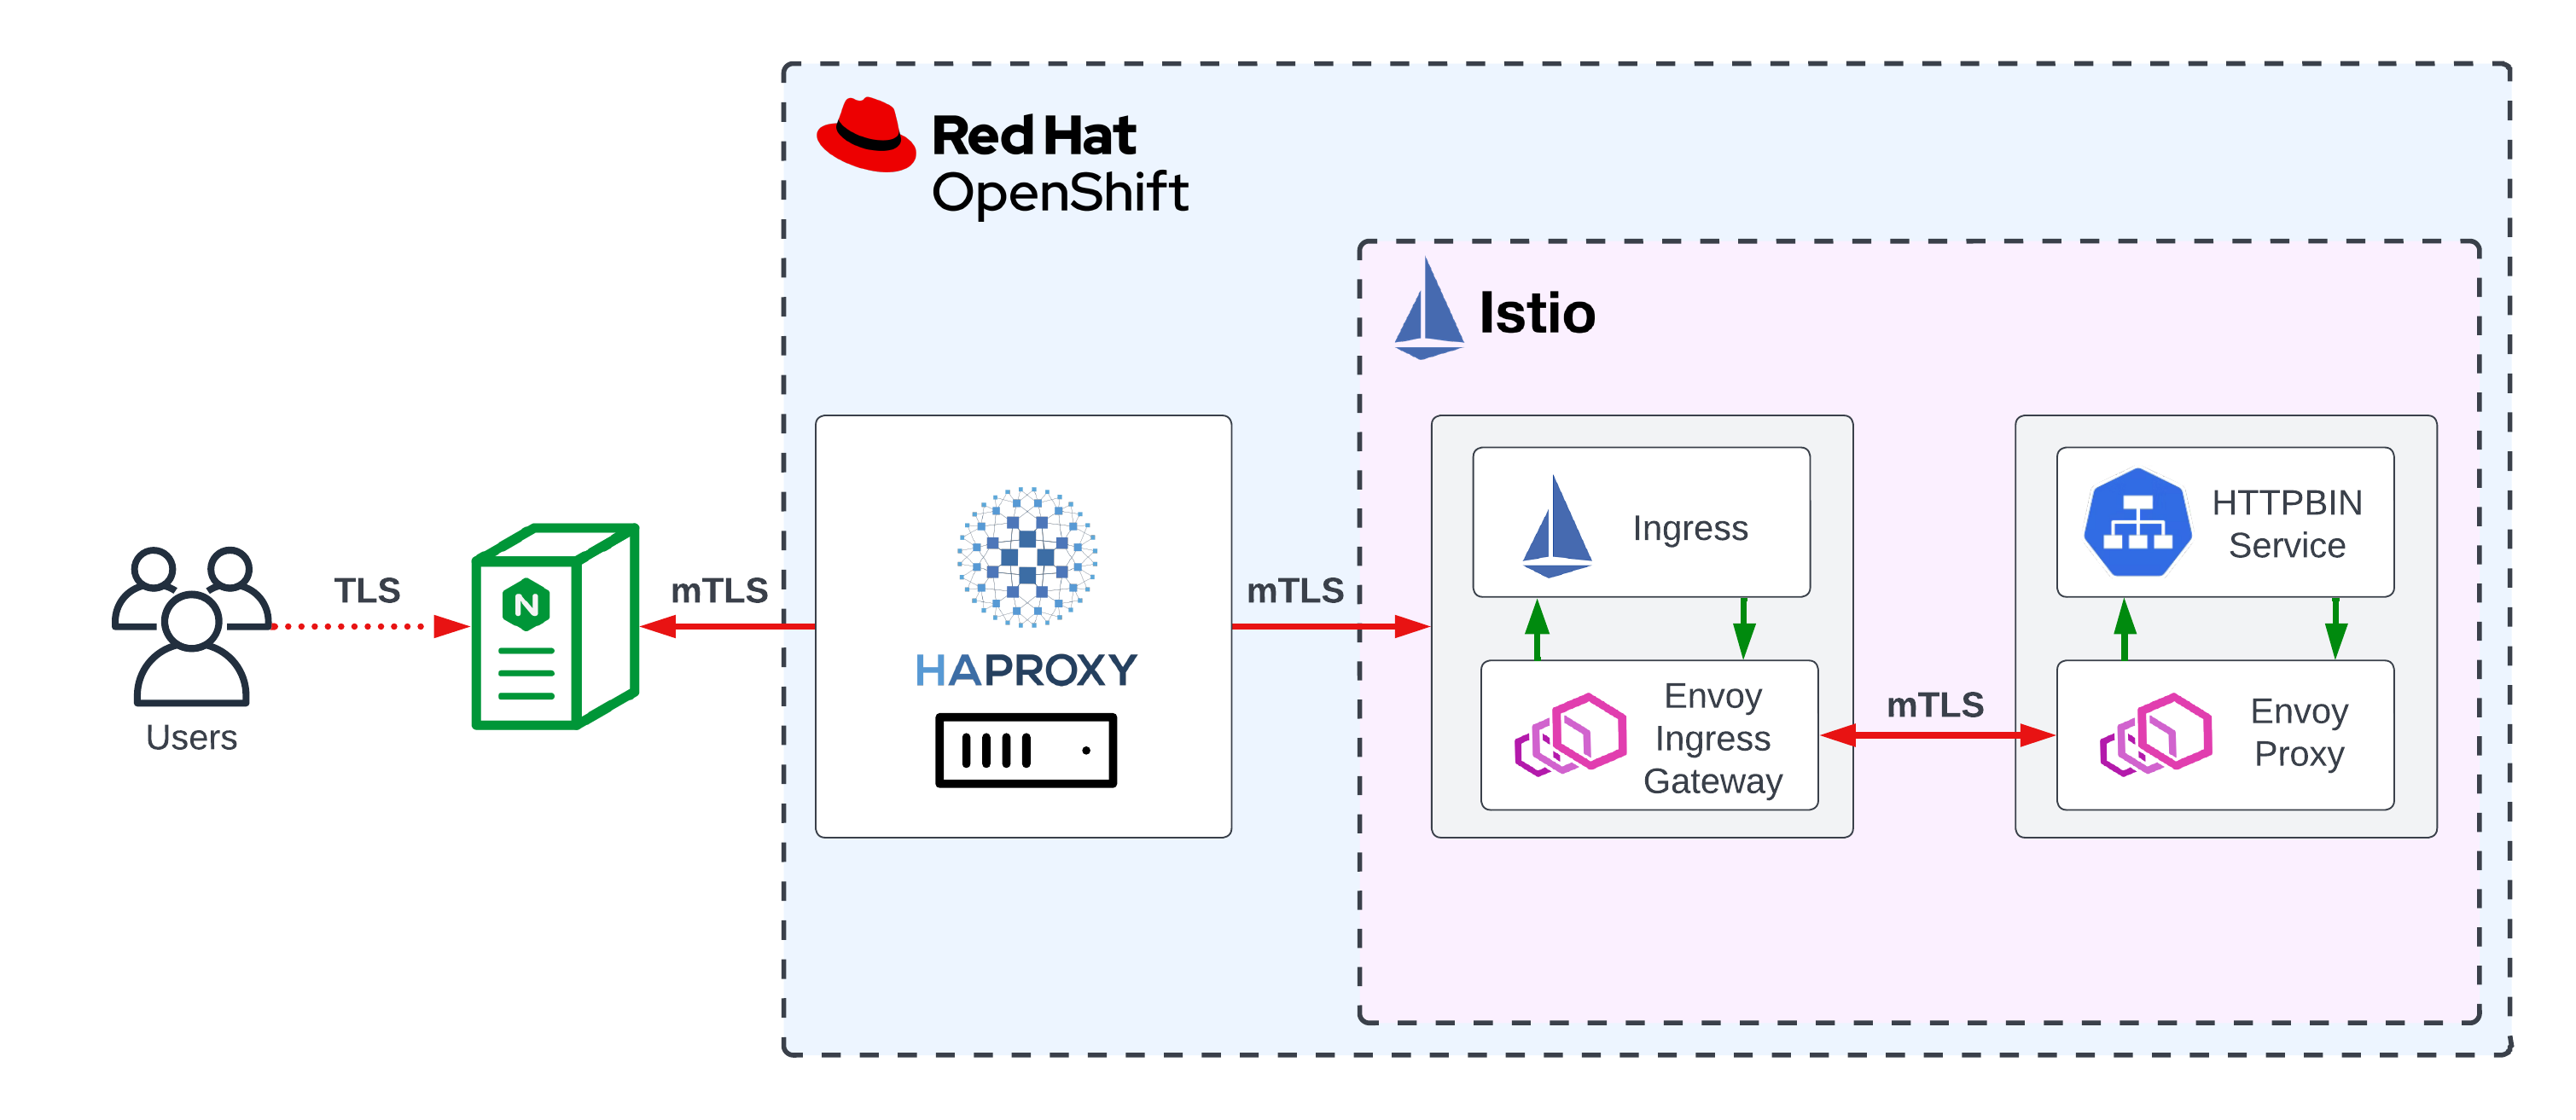
With respect to mTLS and Service Mesh, it’s often referred to in the context of service-to-service interaction from inside the mesh. In this post we’ll look at example of an external server communicating with an application running inside an OpenShift Service Mesh 2.x. This external server will act as a reverse proxy to facilitate the ingress routing to our microservice.
Why stand up a Layer 7 Load Balancer/Reverse Proxy externally when we can run a perfectly adequate ingress gateway at the mesh edge?
With this architecture, we’re attempting to depict a common enterprise scenario with a GTM/LTM fronting various virtual and containerised applications and offloading protection measures such as DDoS mitigation and traffic filtering to a dedicated appliance. Additionally, we may be tailoring our solution for mutli-cluster and mutli-regional load balancing, the latter particularly relevant to the cloud.
Moreover, security benchmarks such as the Payment Card Industry - Data Security Standard (PCI - DSS), declare inbound traffic is a strict no-no for Internet to Cardholder Data Environment (CDE) communication. Bringing in an intermediate server or reverse proxy in the DMZ serves as one approach to address this compliance requirement.
PCI-DSS 1.3.1: Implement a DMZ to limit inbound traffic to only system components that provide authorized publicly accessible services, protocols, and ports.
The example in this article represents are very stripped down, rudimentary setup of an NGINX Reverse Proxy fronting an httpbin workload running in an instance of OpenShift Service Mesh 2.x; a birthchild of the Istio project. The intention here is to highlight a prominent security feature in mTLS that is becoming increasingly sought after, although not unique to, in microservices and service mesh technologies alike.
Step 1: Installing Service Mesh
This post will focus less on spinning up OpenShift Service Mesh 2.x and more on the mTLS between client (the reverse proxy) and server (our sample httpbin application). The latter will be accessed via its own Ingress Gateway deployed in the mesh.
We can defer the installation method to the official steps, but at a high level, standing up Red Hat OpenShift Service Mesh (RHOSSM) entails installing four Operators:
- ElasticSearch Operator (by Red Hat)
- Jaeger Operator (by Red Hat)
- Kiali Operator (by Red Hat)
- OpenShift Service Mesh Operator (by Red Hat)
Step 2: Bringing up the Service Mesh Control Plane
With the Operators deployed, go ahead and install the control plane as per the documented steps, including deploying the basic ServiceMeshControlPlane (provided in the docs) to the istio-system namespace that we will create as a preliminary step.
Let’s create the namespace where our Istio control plane will live.
$ oc new-project istio-system
$ cat <<EOF | oc apply -f -
apiVersion: maistra.io/v2
kind: ServiceMeshControlPlane
metadata:
  name: basic
  namespace: istio-system
spec:
  version: v2.0
  tracing:
    type: Jaeger
    sampling: 10000
  addons:
    jaeger:
      name: jaeger
      install:
        storage:
          type: Memory
    kiali:
      enabled: true
      name: kiali
    grafana:
      enabled: true
EOF
Step 3: Creating our application namespace
We’ll move on to creating the namespace where our application will reside.
$ oc new-project httpbin
Next, either via the console or CLI we will deploy the default ServiceMeshMemberRoll object in the RHOSSM control plane namespace of istio-system.
Namespaces listed in the ServiceMeshMemberRoll resource are the applications and workflows that are managed by the ServiceMeshControlPlane resource.
$ cat <<EOF | oc apply -f -
apiVersion: maistra.io/v1
kind: ServiceMeshMemberRoll
metadata:
  name: default
  namespace: istio-system
spec:
  members:
    - httpbin
EOF
Now, we should see the status of the Member Roll as Configured.
$  oc get smmr -n istio-system default
NAME      READY   STATUS       AGE
default   1/1     Configured   10s
Step 4: Deploying our application
This sample application runs a single-replica httpbin as an Istio service taken from this example documentation. When deploying an application, you must opt-in to the injection of the Envoy proxy sidecar by configuring the annotation sidecar.istio.io/inject=true. The Envoy proxy is the Istio component responsible for brokering the in- and outbound communication to the workload (pod) it is tied to. More information can be found here on all the pieces of the puzzle that is Service Mesh architecture.
To make this pod run in OpenShift, we need to allow it to use the anyuid Security Context Constraints (SCC) which we’ll bind to the default service account of the httpbin namespace. This should not be considered general practice and assignment of SCCs should be assessed on a per-application basis.
$ oc project httpbin && \
oc apply -f https://raw.githubusercontent.com/istio/istio/release-1.13/samples/httpbin/httpbin.yaml && \
oc patch deployment httpbin --patch "{\"spec\":{\"template\":{\"metadata\":{\"annotations\":{\"sidecar.istio.io\/inject\":\"true\"}}}}}"
OR if we’d like to do this at a global level affecting all workloads in the namespace then we can do this via oc label
$ oc label namespace httpbin istio-injection=enabled --overwrite
$ oc adm policy add-scc-to-user anyuid -z httpbin && \
oc rollout restart deployment/httpbin
We can head over to the Kiali Dashboard to validate that the sidecar is present in our httpbin deployment.
Grab the Kiali route:
$ oc get route kiali -n istio-system
NAME    HOST/PORT                                       PATH   SERVICES   PORT    TERMINATION          WILDCARD
kiali   kiali-istio-system.apps.cluster-sandbox-1.com          kiali      <all>   reencrypt/Redirect   None
Go to Workloads, and view our deployed application under the namespace httpbin.
If we observe no  warning then we're all clear from a sidecar perspective.

Step 5: Generating server certificates and keys for our application
At this point, our application should be active and registered as an application in the mesh. Next we’ll use openssl to generate our certificates and keys. For the context of this demo, we’ll resort to creating our own CA and create a self-signed certificate for our company Example Corp.
First let’s create our Root CA and Private Key.
$ mkdir /var/tmp/{certs,private} && \
openssl req -x509 -sha256 -nodes -days 365 -newkey rsa:2048 -subj '/O=Example Corp./CN=example.com' -keyout /var/tmp/private/rootCAKey.pem -out /var/tmp/certs/rootCACert.pem
Next, let’s generate a Certificate Signing Request (CSR) which we will then sign.
$ SUBDOMAIN=$(oc whoami --show-console  | awk -F'console.' '{print $3}') && \
CN=httpbin.$SUBDOMAIN && \
openssl req -out /var/tmp/certs/httpbin.example.com.csr -newkey rsa:2048 -nodes -keyout /var/tmp/private/httpbin.example.com.key -subj "/CN=${CN}/O=httpbin organization" && \
openssl x509 -req -sha256 -days 365 -CA /var/tmp/certs/rootCACert.pem -CAkey /var/tmp/private/rootCAKey.pem -set_serial 0 -in /var/tmp/certs/httpbin.example.com.csr -out /var/tmp/certs/httpbin.example.com.crt
Finally, we’ll store this in an OpenShift Secret to later refer to in our Gateway deployment.
$ oc create secret generic httpbin-credential --from-file=tls.crt=/var/tmp/certs/httpbin.example.com.crt --from-file=tls.key=/var/tmp/private/httpbin.example.com.key --from-file=ca.crt=/var/tmp/certs/rootCACert.pem -n istio-system
Step 6: Deploying the Ingress Gateway
Gateways in Istio are applied to the standalone Envoy proxies at the edge of the mesh. It’s here where we’ll assert our TLS configuration and the routing rules defined within a VirtualService which will be bound to the Gateway.
Again, we’ll make use of the example in the Istio documentation - only with one important distinction. Instead of the TLS mode set to SIMPLE, we want to enforce MUTUAL.
We can go ahead and deploy our Gateway with the alteration.
$ cat <<EOF | oc apply -f -
apiVersion: networking.istio.io/v1alpha3
kind: Gateway
metadata:
  name: httpbin
  namespace: httpbin
spec:
  selector:
    istio: ingressgateway # use istio default ingress gateway
  servers:
  - port:
      number: 443
      name: https
      protocol: HTTPS
    tls:
      mode: MUTUAL
      credentialName: httpbin-credential # must be the same as secret
    hosts:
    - httpbin.${SUBDOMAIN}
EOF
In OpenShift Service Mesh, every time we deploy a Gateway, an OpenShift route is automatically created. Updates and deletes will also be reflected. We can however, disable this automation altogether if we want to.
We can verify the route’s creation in the istio-system namespace.
$ oc get route -n istio-system -l maistra.io/gateway-name=httpbin
NAME                               HOST/PORT                            PATH   SERVICES               PORT    TERMINATION   WILDCARD
httpbin-httpbin-dcfcfc0729048e03   httpbin.apps.cluster-sandbox-1.com          istio-ingressgateway   https   passthrough   None
From here, we’ll create our VirtualService which you can see embeds certain paths to route to the backend service.
$ cat <<EOF | oc apply -f -
apiVersion: networking.istio.io/v1alpha3
kind: VirtualService
metadata:
  name: httpbin
  namespace: httpbin
spec:
  hosts:
  - "httpbin.${SUBDOMAIN}"
  gateways:
  - httpbin
  http:
  - match:
    - uri:
        prefix: /status
    - uri:
        prefix: /delay
    route:
    - destination:
        port:
          number: 8000
        host: httpbin
EOF
Let’s validate its deployment:
$ oc get virtualservice -n httpbin
NAME      GATEWAYS      HOSTS                                    AGE
httpbin   ["httpbin"]   ["httpbin.apps.cluster-sandbox-1.com"]   20s
Performing the curl to simulate as if we were just any old client in possession of the Root CA, we are met with a certificate required error which is to be expected.
$ curl  --cacert /var/tmp/certs/rootCACert.pem https://httpbin.apps.cluster-sandbox-1.com/status/418 -I
curl: (56) OpenSSL SSL_read: error:1409445C:SSL routines:ssl3_read_bytes:tlsv13 alert certificate required, errno 0
Changing our TLS mode to SIMPLE on the Gateway would return a response as client certificate validation wouldn’t be required.
$ curl --cacert /var/tmp/certs/rootCACert.pem https://httpbin.${SUBDOMAIN}/status/418

    -=[ teapot ]=-

       _...._
     .'  _ _ `.
    | ."` ^ `". _,
    \_;`"---"`|//
      |       ;/
      \_     _/
        `"""`
Step 7: Creating the client’s keys and certificates
We essentially repeat the process to create the client’s key and certificate, and perform the self-signature with the CA created earlier.
Recall that the client in our example will in fact be the NGINX Reverse Proxy that we will stand up in a moment.
Let’s create this certificate as a wildcard with a Subject Alternative Name (SAN) to cater for our frontend route that we’ll access as a concluding step.
cat <<EOF > req.cfg
[req]
req_extensions = v3_req
distinguished_name = req_distinguished_name

[req_distinguished_name]

[v3_req]
keyUsage = nonRepudiation, digitalSignature, keyEncipherment
subjectAltName = @alt_names

[alt_names]
DNS.1 = *.example.com
DNS.2 = *.frontend.example.com
EOF
And now we’re clear to create our self-signed certificate.
$ openssl req -out /var/tmp/certs/example.com.csr -newkey rsa:2048 -nodes -keyout /var/tmp/private/example.com.key -subj "/CN=reverseproxy.example.com/O=Example Org" -config req.cfg && \
openssl x509 -req -sha256 -days 365 -CA /var/tmp/certs/rootCACert.pem -CAkey /var/tmp/private/rootCAKey.pem  -CAcreateserial -in /var/tmp/certs/example.com.csr -out /var/tmp/certs/example.com.crt -extensions v3_req -extfile req.cfg
We should be at the point now where we run the same curl with the addition of the NGINX certificate and keys and get a valid response back from the server.
$ curl --key /var/tmp/private/example.com.key --cert /var/tmp/certs/example.com.crt --cacert /var/tmp/certs/rootCACert.pem https://httpbin.${SUBDOMAIN}/status/418

    -=[ teapot ]=-

       _...._
     .'  _ _ `.
    | ."` ^ `". _,
    \_;`"---"`|//
      |       ;/
      \_     _/
        `"""`
With that success, we’re now good to transpose these certificates and keys over to our NGINX config in an upcoming step.
Step 8: Deploying our NGINX Reverse Proxy
It’s time now to deploy our reverse proxy that will act as an intermediary server between our client and httpbin backend residing in the Service Mesh.
This example will run NGINX on a bastion server and depending on your running operating system, the installation method could vary. For RHEL 8, it’s as simple as:
$ sudo yum install nginx -y
We’ll copy over all our created certificates and keys to more friendly directories for NGINX:
sudo mkdir -p /etc/nginx/ssl/{certs,private} && \
sudo cp /var/tmp/certs/* /etc/nginx/ssl/certs && \
sudo cp /var/tmp/private/* /etc/nginx/ssl/private
For the purposes of this demo we’ve hijacked port 80 from the default /etc/nginx/nginx.conf configuration. So left unchanged you will run into conflict issues when you attempt to restart the nginx service.
Below is the complete excerpt of our reverse proxy config. Basically, we’re setting NGINX up to listen for all traffic on port 80 and 443. The former we want to rewrite to the latter which will be expressed via a 301 return code.
The proxy_pass command directs all traffic on 443 to our httpbin Ingress Gateway on the edge of the mesh with the appropriate client certs that we validated in the previous curl.
$ sudo cat <<EOF > /etc/nginx/conf.d/proxy.conf
server {
    listen 80 default_server;
    listen [::]:80 default_server;
    server_name  _;

    listen 443 ssl;

    # RSA certificate
    ssl_certificate /etc/nginx/ssl/certs/example.com.crt;
    ssl_certificate_key /etc/nginx/ssl/private/example.com.key;

    ssl_client_certificate /etc/nginx/ssl/certs/rootCACert.pem;
    ssl_verify_client	  optional;

    # Redirect non-https traffic to https
    if ($scheme != "https") {
        return 301 https://$host$request_uri;
    }
        location /status/418 {
            proxy_pass                    https://httpbin.apps.cluster-sandbox-1.com;
            proxy_ssl_certificate         /etc/nginx/ssl/certs/example.com.crt;
            proxy_ssl_certificate_key     /etc/nginx/ssl/private/example.com.key;
            proxy_ssl_protocols           TLSv1 TLSv1.1 TLSv1.2;
            proxy_ssl_ciphers             HIGH:!aNULL:!MD5;
            proxy_ssl_trusted_certificate /etc/nginx/ssl/certs/rootCACert.pem;

            proxy_ssl_verify        on;

            proxy_ssl_server_name on;

            proxy_http_version 1.1;
            proxy_set_header Upgrade $http_upgrade;
            proxy_set_header Connection "upgrade";
        }
}
EOF
We’ve included the example.com.crt and example.com.key as both the client AND server certificate/key pair in this instance. This certificate is presented, when asked, to connections attempting to contact the reverse proxy server in addition to representing the SSL certificate that will be presented to the backend server; identified by proxy_pass which is our exposed httpbin application from the mesh.
ssl_client_certificates is a switch that enables/disables the reverse proxy server’s certificate authentication behavior. Here we’ve set it to optional. It really depends on how you are serving your application, but given ours pertains to a simple HTTP Request & Response Service (httpbin) - a curl command or browser will be our front door. Authenticating for client certificates in this context may perhaps be easier to manage in an internal corporate environment where you could have more or more trusted root certificates, concatenated into a single file. Outside this though, the overhead of managing an accepted list of CAs through various vendors' trust programs could prove burdensome.
Step 9: Testing our httpbin endpoint with mTLS enabled
We’re going to set up local DNS to set up httpbin.frontend.example.com to resolve to our localhost NGINX server.
Enable and restart the nginx service.
sudo systemctl enable nginx && \
sudo systemctl restart nginx
And with any luck we should end up with…
$ curl --cacert /var/tmp/certs/rootCACert.pem  https://httpbin.frontend.example.com/status/418

    -=[ teapot ]=-

       _...._
     .'  _ _ `.
    | ."` ^ `". _,
    \_;`"---"`|//
      |       ;/
      \_     _/
        `"""`
🎉 🎉
Wrap Up
This was just a fun dabble demonstrating mTLS communication from outside Istio. Certainly there’s benefit in drawing from some of the security architecture in here that could be implemented in a scale-out enterprise environment - it’s a balance of risks and needs; and where and how we terminate SSL is certainly one of those considerations.
It should be noted that as of OpenShift 4.9, mTLS authentication can be enabled in the Ingress Controller, so there are other, arguably simpler ways if we want just want to cherry-pick certain security features that were only previously on Istio’s bumper sticker, at least in the OpenShift space 😄
I hope you got some value from the above walkthrough and most importantly, hopefully forwards any discussions you might be having in your team on how you treat your Kubernetes/Service Mesh SSL.
comments powered by Disqus